Shin splints are the injury that punishes you for getting fitter. Mine got worse in January, and by the end of February I had to stop a run because the pain kept building. It cost me the half marathon I had signed up for, so I raced the 8 km instead. By June I was running normally again, and it took more than one fix. Here is how to get rid of shin splints, based on what worked for me and what the research does and doesn’t back.
TL;DR: Shin splints usually settle with a slower, structured return to running, a small bump in cadence and some lower leg strength work. Shoes matter less than most of us were told, and the part people get wrong is how fast they come back.
Key takeaways
- Back off, but don’t stop everything. Run/walk intervals let the shin come back gradually.
- Your heart and lungs get used to running faster than your shins do. Feeling fine is not a green light.
- Raising your cadence can lower the load on your lower leg, but only if you add a couple of steps per minute at a time.
- Matching shoes to your pronation has little support behind it. Comfort is a better filter.
- Warm up every run, stretch after, and keep calf, ankle and hip strength work in your week.
How to get rid of shin splints: back off, then rebuild
The short version of how to get rid of shin splints is to cut the load, then bring it back in small steps. That sounds obvious. Most of us do the opposite, because the pain fades after a few easy days and it feels like the problem is gone.
Complete rest usually isn’t necessary. You can keep your fitness up on the bike or in the pool, as long as it doesn’t hurt. What you change is the running.
What shin splints actually are
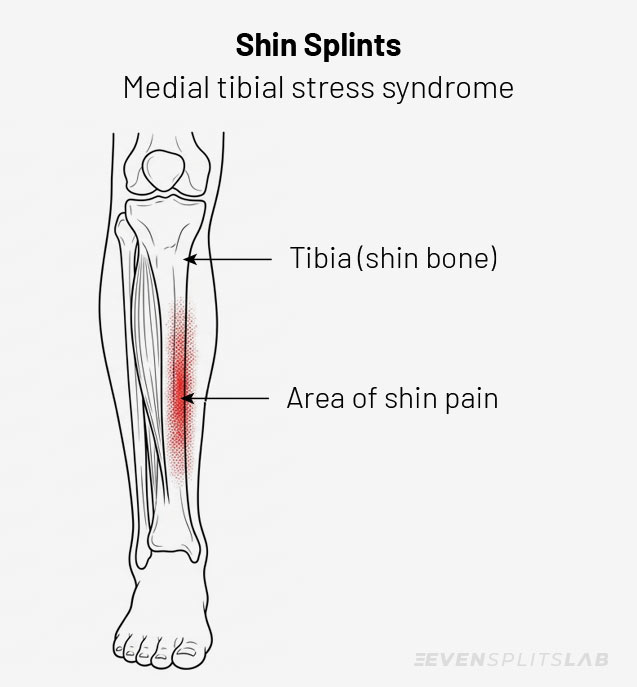
Shin splints is a catch-all name. Most of the time it means medial tibial stress syndrome, which is pain along the inner edge of the shin bone. Emory Healthcare describes it as repeated load that breaks tissue down faster than your body can repair it. The tissue in question is the lining of the bone and the tendons that attach to it.
It usually starts as soreness after a run, then moves to the start of the run and eases off once you are warm. If you keep pushing, it tends to hang around longer.
Is it shin splints or a stress fracture?
Shin splints usually feel like a diffuse ache along several centimetres of the inner shin. A stress fracture is more often a sore spot you can point to with one finger. Pain that gets worse while walking, or wakes you up at night, is a reason to see a doctor or physio before you run again.
I’m not a doctor, and a stress fracture needs a different plan than the one below.
Your heart gets used to running faster than your shins do
Cardio fitness comes back quickly. Within a few weeks, your heart and lungs can feel ready for far more than your shins can handle. Bone and the tissue attached to it take longer to get used to the load, in practice months rather than weeks.
Your legs feel fine and your breathing feels fine. The shin, meanwhile, hasn’t been consulted.
So don’t use how you feel as the green light. Use the shin. If it stays quiet during the run and the next morning, you can move up. If it doesn’t, hold where you are. That’s why I treat the plan below as a ladder, not a calendar.
How to return to running after shin splints
Start with run/walk intervals instead of a short continuous run. My physio told me to begin with four minutes of running and one minute of walking, repeated three times. That made my first run 15 minutes. I ran three times a week and moved up one step at a time: five minutes of running, then six, then seven, always with one minute of walking and always three rounds.
Here is the ladder. If four minutes of running hurts, start lower.
| Stage | Run / walk, 3 rounds | Total | Note |
|---|---|---|---|
| Stage 1 | 2 min run, 1 min walk | 9 min | Start here if 4 and 1 hurts |
| Stage 2 | 3 min run, 1 min walk | 12 min | Or here |
| Stage 3 | 4 min run, 1 min walk | 15 min | Where I started |
| Stage 4 | 5 min run, 1 min walk | 18 min | One more minute of running |
| Stage 5 | 6 min run, 1 min walk | 21 min | One more minute of running |
| Stage 6 | 7 min run, 1 min walk | 24 min | Next: longer runs, shorter walks |
Move up when the session is pain free and the shin still feels quiet the next morning. If you’re not sure, repeat a stage once before moving on. Rest or cross-train between sessions. Three runs a week was plenty for me.
If the shin hurts during a session, stop and walk home. Repeat the previous stage next time. Finishing the set is not worth it.
For me, the first faster running came around week five. Before that, everything was easy. From stage 6 it’s just a longer run portion each time, until the walks disappear.
Fair warning: run/walk is boring. Four minutes on, one minute off, three rounds, three times a week. I had to push myself through it. There’s no clever way around that part. Patience is the plan.
Cadence: the one change I’d credit most
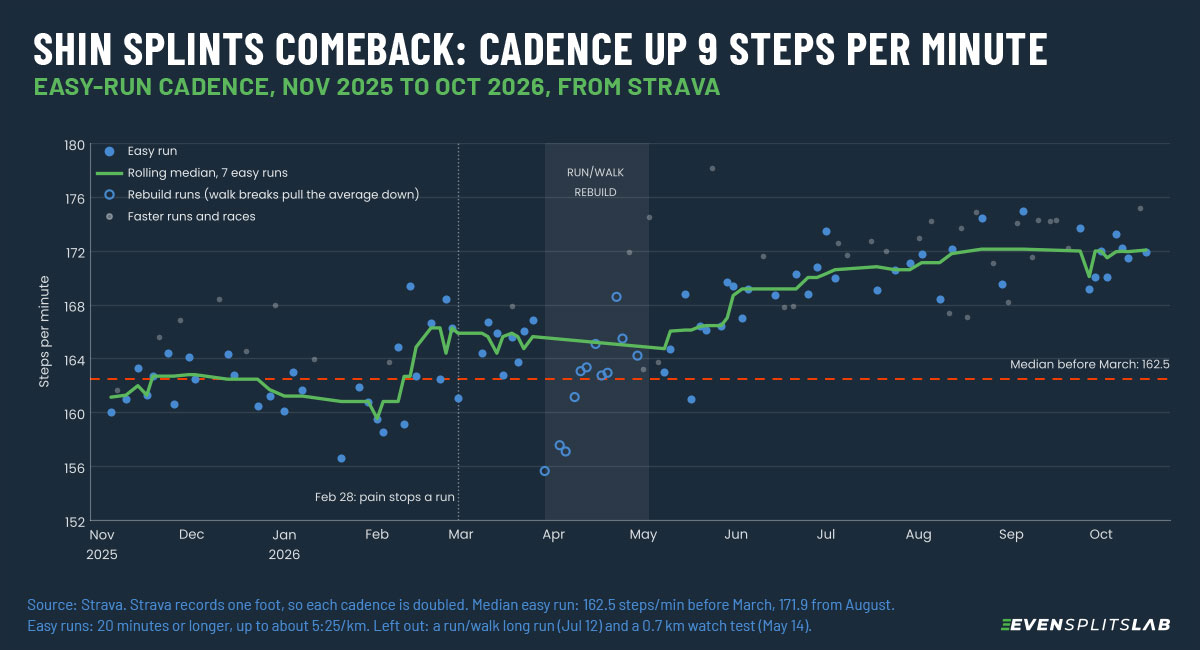
If you change one thing about how you run, I’d look at cadence. I used to run at about 165 steps per minute. Now I sit at 172 to 174. That’s roughly a 4 to 5 percent bump, and it feels natural now.
It wasn’t the only thing I changed, so I won’t claim it fixed everything. It’s the one I’d keep.
Why it might help: a higher cadence usually means shorter steps, which lowers how hard each foot lands. In a small University of Canberra lab study of 16 runners, a 10 percent cadence increase cut peak shock through the shin by about 11.5 percent. It also cut how quickly the load builds on landing by about 15.6 percent. A 2025 systematic review in Cureus found that moderate increases, around 5 to 10 percent, gave consistent biomechanical improvements and hinted at a protective effect for injuries like tibial stress fractures.
That’s small samples and mostly lab work, and none of it is proof for shin splints specifically. I’d call it promising, not proven. Here is how I’d try it:
- Find your baseline on an easy run. Your watch usually shows it. If the number looks like 85, it’s probably one foot, so double it.
- Add about 2 steps per minute, not more. At 165, that means aiming for 167. A metronome app or a playlist at the right tempo helps. Even with a metronome, I couldn’t jump from 165 to 173 naturally. It was hard to maintain.
- Keep your pace the same. You want shorter, quicker steps, not faster running.
- Expect your heart rate to run a bit higher for a while, until you get used to the new rhythm. Keep an eye on it during Zone 2 runs and ease the pace if it drifts out of the zone.
- Hold each step until it feels natural, then add another 2.
Two steps sounds tiny. It adds up. The studies above test changes of 5 to 10 percent. I’d treat that as the destination, not the first step. Don’t chase a magic number like 180. Cadence takes time, so don’t force it. Mine settled at 172 to 174 and that’s where it feels natural.
Shoes: stability isn’t what I thought it was
I ran in stability shoes because I thought they were for people who supinate. They aren’t. Stability shoes are built for overpronation, where the foot rolls inward. Supination, where it rolls outward, is usually paired with neutral, cushioned shoes. I had it backwards, and I thought the shoes were helping. They weren’t.
Even the correct pairing is on shaky ground. A 2022 review by Agresta and colleagues concluded that choosing shoes based on foot posture isn’t well supported. Their default suggestion was lightweight, comfortable shoes with minimal pronation control.
So skip the pronation lecture. Try a few pairs and run in them, not just walk around the store. The pair that feels smoothest at your normal easy pace is usually the right call. Shoes aren’t the main lever here.
Some brands let you test a pair properly. Brooks has a 90 day Run Happy Promise in Canada. You can wear the shoes and send them back if you don’t love them, as long as you bought them on the Brooks site. HOKA has a 30 day guarantee and tells you to take the shoes for a run or two. When I checked, the Canadian pages for Saucony, ASICS and New Balance only took back unworn shoes, so don’t run in a pair until you’ve read the policy. These change, so check the current terms before you buy.
Shin splints exercises that share the load
I don’t think any single exercise cures shin splints. An older review of prevention methods covered insoles, Achilles stretching, footwear and graduated running programs and found no evidence that any one of them worked on its own. The idea behind strength work is simpler: stronger calves, ankles and hips take some of the load off the shin.
- Resistance band ankle work. Loop a band around your forefoot, pull your toes up toward your shin, then turn the foot in and out against the band. Go slowly.
- Bent-knee calf raises with a slow lower. Keep your knees bent, rise up on both feet, then take three or four seconds to come down. Bent knees put more work on the soleus, a deep calf muscle.
- Step-ups and step-downs. Step up onto a box or stair, then lower yourself back down with control. The step-down is the harder half.
- Glute bridges. Lie on your back with your feet flat, lift your hips and squeeze. It keeps your hips doing their share.
Two or three sets of 10 to 15 slow reps, a few times a week, is a sensible place to start for most people. Straight-knee calf raises and toe raises are good additions once the basics feel easy. If an exercise makes your shin hurt, skip it and back off.
Zone 2 kept the engine running
While my shins caught up, I kept everything easy. For about five weeks it was run/walk intervals and a lot of Zone 2 work, with no speed. As a side effect, my Zone 2 improved too.
Easy is harder to hit than it sounds. Most easy runs are faster than they should be, and if you’re not sure where your Zone 2 sits, here is how to find your Zone 2. I’ve also written about keeping your fitness while injured, which is useful for the weeks when running is limited.
Find your Zone 2 in 2 minutes
Easy is easier to hit when you know your numbers. Our HR Zone Finder gives you personal zones from your max HR or lactate threshold.
Warm up before every run, stretch after

Warm-ups are non-negotiable for me. So is stretching after, especially past 40. I’ll be honest: I can’t point to a study that says stretching cures shin splints, and the prevention review above didn’t find Achilles stretching worked on its own. I do it to avoid other injuries. Shin splints aren’t the only way to wreck a season.
My warm-up is simple: a few minutes of brisk walking, leg swings, ankle circles and a few slow calf raises, then start easy. After the run, stretch your calves with the knee straight and bent, plus your hips and quads, for about 30 seconds each. If you’re past 40, recovery after 40 deserves its own plan.
Quick answers about shin splints
It depends on how long you’ve been running on them. For me it was about five weeks until the first faster running, and roughly two to three months until I was running normally again. The rebuild is the slow part, not the pain.
Usually, yes, as long as it doesn’t hurt your shin. Both keep your aerobic base going without the pounding of running. Stop if pain shows up, and see a doctor or physio if it gets worse.
Raise your running load gradually. The old 10 percent a week rule is a rough guide, not a law. Keep strength work in your week, warm up, wear shoes that feel comfortable, and nudge cadence up slowly if you’re a low-cadence runner.
Sources
- Shin splints (Emory Healthcare)
- The influence of running technique modifications on vertical tibial loading (University of Canberra)
- The influence of running cadence on biomechanics and injury prevention: a systematic review (Cureus, 2025)
- Running injury paradigms and their influence on footwear design features and runner assessment methods (Agresta et al., 2022)
- Medial tibial stress syndrome: evidence-based prevention (Journal of Athletic Training)
- Brooks Run Happy Promise (Canada)
- The 30 Day Guarantee (HOKA Canada)